• About Us

Formstone Castle

~ in Baltimore, Maryland

Formstone Castle

Category Archives: Home Improvement

The Old Work Horse

23 Tuesday Oct 2012

Posted by Mike in Home Improvement

≈ Leave a Comment

The sky is the limit… Miata as a truck.

This week we had a few days of uncertainty with our transportation.  Its not much, but this old not-the-best-repainted-Miata, is all we’ve got.  I’ve long said that in a Miata you can carry as much as you like: the sky is the limit.  In this photo I’m carrying a 10′ long 4×6.  Siri has also used the car to carry 10′ lengths of black pipe, 2x6s and PVC pipe.

Last Thursday, on her way to pick up some supplies, Siri’s key broke off deep in the ignition.  She managed to get it towed home for free with an auto club membership, but they wouldn’t cover a lock smith.  We experimented with some Internet advice, but those techniques didn’t even begin to work.  The first lock smith we called out on Saturday, even after bringing in more help, gave up after 4 hours.  This is when we REALLY started to worry.  After a few days of doubt, today we called a second lock smith.  It only took him a few minutes.  Although it cost us over $100, it was quite a relief to get transportation back.

Floors… Save the floors!

23 Tuesday Oct 2012

Posted by Mike in Home Improvement

≈ Leave a Comment

Sliding in a board to save the tongue and groove.

Decades ago, when the owners of the house retrofitted it with electric, rather than tear out the laths and plaster, they cut out the tongues of the floor boards and pulled them up.  FUCKERS!  Now we have to replace those boards, but with what?

A few weeks ago we replaced the bathroom floor with 3/4″ plywood.  We saved the boards we pulled up.  Most of them are in rough shape be it termites or water damage, but that’s all we had.

We started by replacing boards with matching width donors.  They went in easy enough, but seemed to have huge gaps.  It was really a let down as a first impression.  What do we do next?

Once we cleaned all the dirt, plaster and paint from all the other gaps in the floor, we realized that these 1/8″ gaps were pretty standard.  With the doubts behind us, we forged on.  We managed to replace all the boards we had matches for.

To get down to a few final boards our friend Ian was kind enough to lend us his table saw so we could cut down some boards and add a groove so they would fit better.  This gave us enough certainty that we could move along with installing the PEX under the floors.

We still have one more floor board to go.  We’ve scoured Second Chance, a local architectural salvage company, but found no 7/8″ pine wide enough.  Might need to make it from new wood.


Oh, the layers…

07 Sunday Oct 2012

Posted by Siri in Home Improvement

≈ Leave a Comment

20121007-182017.jpg

Bricks, Bricks and More Bricks

05 Friday Oct 2012

Posted by Mike in Home Improvement

≈ Leave a Comment

Several weeks ago, after finishing the bathroom subfloor, we started working on repairing the bricks. Mom and dad came to help each weekend. They brought sand, extra bricks and the know-how to get us going. Little did we know that the process would take us all month.

Weekend 1:

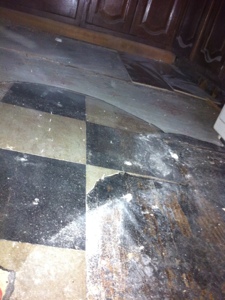
First up was the back bathroom wall. We started by removing all the bricks we could lift out by hand. Trouble was, they just kept coming: past the floor, down below the first floor window all the way to our bathroom drain pipe next to the lintel. Here is a photo when we had all the loose bricks out:

Missing a Few Bricks

It took all day until we ran out of sand. I’ll round up a photo of the completed wall and post it here in a bit.

Next on the list was the top of the 3rd floor wall. The lintel above the window was a 2×6 and it was sagging from the 5 courses of bricks stacked on top of it. Because of the sagging, all of the mortar on these bricks was crumbling. The header board wasn’t faring much better either. Also a 2×6, it had been sitting on wet bricks rotting for years. Running across the back wall and over the 5 foot span over the stairs, this board was no longer up to the task of supporting the roof.

To do the work, we took the weight off the roof by wedging the walls I had built under the 2×4 rafters. Same as before we removed all of the bricks we could take out by hand. This got us down to the top of the window pretty quickly. We replaced the sagging 2×6 lintel with a treated 4×6 and built back the bricks from there. On top we placed another treated 4×6 to replace the header board. Since the ends of the rafters were rotted at the ends, we decided to cut off the ends and use hangers to support the 2x4s to the new header. The header over the stairs is now strong enough to support the roof without a post in the middle really opening up the space. This process took the rest of the weekend. The end result is quite an improvement though:

That’s Better!

Weekend 2:

Next on the brick repair list was the sides of the house just under the roof. The brick walls are 2 courses thick which support two main beams (2 1/2″ x 7″ rough cut) and two secondary beams which, best I can tell, carried no load at all. Above these pockets the bricks do not carry load, but do finish up the walls up to the roof decking. These bricks were mostly sitting up there, mortar long since turned to dust and blown away. Just mortar them in and we’re done.

Before

Not so fast. We’re not going to repair the bricks and leave the roof problems unsolved. We’ve decided to add several more beams to carry the load of the roof. One on the front wall, and two more between the existing two beams. This gives us a total of 5 beams spaced 4 feet apart. We can also add more 2x4s now that we can use the front beam to carry the load at the end rather than using the pockets in the front wall. And while we were at it, we decided to brick up two courses all the way up to the header we added. This should help in a few years when we decide to support a roof deck.

A repaired corner.

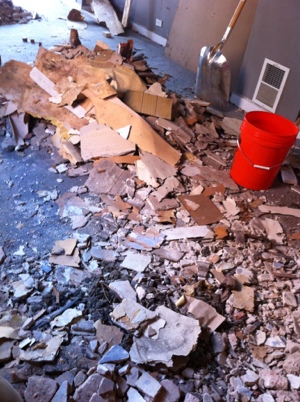
Just this past Tuesday, I finally had a chance to take down the chimney. We will not be using either of our chimneys as our water heater will be sending its exhaust gasses out the side of the house with PVC pipe. Having it above the roof is just a liability. Re-roofing, waterproofing and building the roof deck will all be easier with it gone.

Once the first brick came, the rest was simple. Strangely, this is how half of the chimneys on the block look in their normal state.

Down below the roof. Ready to cut off the tar, fix the bricks and patch the hole.

Special thanks to my mom and dad for helping for on these marathon weekends for the last month. Hopefully this upcoming weekend is the last of it.

Tearing the Place Up (Part III)

10 Monday Sep 2012

Posted by Mike in Home Improvement

≈ Leave a Comment

Flooring removed and safely set aside.

With big plans to fly through the floor and get right to the walls, we hit a major set back once the floor was up.  The two joists under the side window had been water damaged on the end and were no longer supporting the floor.

Before and after.

It took all day to fix these by cutting off 3 feet from the end, and sandwiching pressure treated wood between two 2x8s.  We also leveled the other 4 joists with treated shims.  The end result is a strong and level base for Siri’s bathroom tile to sit on.

Glued, screwed and bolted. This MUST be strong enough now.

Put up walls on Sunday? Nope.  Dad suggested we do the drain plumbing while everything was easy to get to.  We had to put a hole in the external brick wall for a 3″ drain and remove the 4″ cast iron stack.  We also decided that while we were at Home Depot getting plumbing supplies, we should also get all of the dry wall for the 2nd and 3rd floors.  Why now?  It would be impossible to get large sheets up the stairway so its best we slide it up through the open floor while we still can.  This took us into the afternoon.

Finally, late Sunday afternoon, with the joists repaired, the plumbing in and the drywall stacked in the corner, we got to cut and lay down the plywood floor.  Although it took longer than I had hoped to get to this point, I believe this will save us time and hassle in the future by better support the bathrooms tile flooring.

Siri and dad showing off the new bathroom subfloor! Thanks mom & dad for coming down and helping all weekened.

Next step is building our bathroom walls.  Hopefully I learned enough this past weekend to do it right.

Tearing the Place Up (Part II)

09 Sunday Sep 2012

Posted by Mike in Home Improvement

≈ Leave a Comment

To prepare for our radiant floor heating, we had to remove all the layers of flooring down to the original 130 year old wood flooring.  I thought this could wait until last until I realized the nails from the sub flooring could possibly puncture the radiant heat’s PEX tubing.  The layers consisted of: carpet, foam, wood paneling subfloor, linoleum, amazingly preserved newspapers from 1953, paint, and finally the original wood flooring.

The layers coming up.  It would have went faster had it not been for the thousands of nails holding down the sub floor.

The 2nd floor cleared of carpet and sub flooring.

The original wood flooring is in decent condition, but not perfect.  When the house was retrofitted with electric, they simply tore up the floor boards above where they needed to run wires, breaking the tongue & groove.  These should be replaced.

There was also some water damage where we are putting the new bathroom.  After some thinking we decided to take up the floor boards and replace them with 3/4″ plywood in order to have a better base for the tile.  Hopefully we will be able to save enough boards to replace the other damaged areas.

Tearing the Place Up (Part I)

05 Wednesday Sep 2012

Posted by Mike in Home Improvement

≈ Leave a Comment

Enough with the history posts, here is what we’ve been working on for what seems like forever: demolition.  Probably 10 pickup truck loads to the dump by now.  One of the earlier tasks was removing the wall between the kitchen and living room and plaster ceiling on the 1st floor:

Removing the wall looking from the back door to the front.

Removing the wall looking from the front door toward the back door.

We also decided to expose the brick on the party wall.  A mountain of plaster was removed to do this.  The mortar looks good enough that we’re considering not pointing it, but rather cleaning it up with a wire brush and sealing it.  If you look closely, you can see we decided to keep some of the wall paper designs on the kitchen wall.

Pictures of little tea pots, clocks, flowers and beer steins.  They’re just too cute to destroy.

They’ve survived since maybe the 1940s; hopefully they will last through the rest of the renovation.  The plan is to clean them up and place frames over them.

A wider view of the wall shows just how nice of condition the bricks are in.

Final clean and sealing of the wall will need to wait though.  We’ve got bigger fish to fry in the coming weeks.  Stay tuned.

Digital Rough-In of Our Heating / Hot Water System

15 Wednesday Aug 2012

Posted by Mike in Home Improvement, Sketchup 3D

≈ Leave a Comment

Is drawing this easier or harder than actually installing it?

This week my primary goal is to get our water working again.  Currently we have removed all plumbing back to the main valve on the wall so we have a blank canvas with which to work.  I’m packaging all the mechanical items in one compact 13″ deep corner between our front wall and a chimney.  This tiny space will contain our gas meter, water heater (acting as both a boiler and a water heater), pumps, distribution manifolds, and all the associated plumbing.

In the Sketchup image above you can see our Noritz tankless water heater (white) at the top with its 3″ PVC intake and exhaust pipes and 3/4″ gas line (yellow).  On the right, our three zone supply (top) and return (bottom) manifolds.  These will have 3/4″ PEX running to smaller manifolds (very top) on under each floor which will make 2x 3/8″ PEX circuits through the floors.  If you were wondering: missing from this sketch are all the valves, water pumps and PEX tubing.  One day.

After the planning, the next step, and my job for the night, is to get the 3/4″ pressure treated plywood mounted to struts hung from the joists.  This is the same technique we used for the electrical panels last weekend.

Chop wood, carry plaster

14 Tuesday Aug 2012

Posted by Siri in Home Improvement

≈ Leave a Comment

20120813-225157.jpg

This weekend’s activities included the removal of 2720 lbs of rubble from the last phase of demolition. How do we know the weight, you might ask… Well, when I took it to the dump, I got sent to the “real” dump, i.e. the actual landfill, complete with bulldozers, buzzards, and quite the smell, rather than the “citizen drop-off site” Iris and I were at previously. So, the truck got weighed coming in and going out. 1.36 tons. 2720 lbs of plaster, laths, drywall, and assorted debris.

20120813-225302.jpg

I wanted to write something about the meditative benefits of carrying bucketsful of plaster down the stairs and out to the truck, and then dumping it out at the landfill, shovelful by shovelful. But no. It wasn’t really very meditative, although in the repetitive Sisyphean nature of it, it was sort of mind-numbing. Mostly it was just really really f’in hard. And I slept really really well. And when I have nice toasty warm feet this winter, and beautiful brick walls to look at, I will know their true value. And now I know that I am capable of shoveling a ton of dirt. I’d say you never know when that ability might come in handy, but I do know. Next weekend we demolish the first floor ceiling and walls.

Breaker Box 2: Electric Boogaloo

12 Sunday Aug 2012

Posted by Mike in Home Improvement

≈ 2 Comments

Tags

electrical, renovations

Before and After

This weekend we got a hand from an electrician friend to fix up our breaker box.  When the old box was installed in 1984, it was mounted to the damp brick wall with particle board.  By the time we got to it, most of the board was on the floor and the box had been hanging from its ground cable.  The meter was in the same condition hanging from its service cable.

We pulled everything out of the way Saturday morning and mounted a 4′ x 3′ sheet of 3/4″ pressure treated plywood hung from the joists on two zinc-coated steel struts.  This gives us a strong base that is less likely to suffer from rust, rot, mold, or critters in a damp environment like a basement.  It also has a good 1″+ of air gap behind the plywood to avoid direct contact to the sometimes damp wall.  (We have been dehumidifying which helps and have also located the main source of our water leak which we will fix in a few months.)

While we were at it, we installed a new 100A breaker box to replace the rusty 28 year old one.  I was being Mr Fussy the whole time making sure all the wires were parallel and staples lined up in a row, but the electrician didn’t mind.  We also tried to tidy up the wires on the ceiling by bringing them all to one side rather than cutting diagonally across.  I have some ideas to tidy this up some more, but for now it will do; we should have very little in our way when we install the PEX for our radiant floor heating.


← Older posts
Newer posts →

♣ Recent Posts

  • After a Decade, the Bathroom Wall is Done!
  • Paid Off the Mortgage
  • Mesh Panels
  • The Giant Deck Update
  • Light City 2018 – What Lies Beneath

♣ Recent Comments

  • Iris on Security
  • Iris on The Kinetic Couch Awakens
  • Iris on The Kinetic Couch Awakens
  • Iris on The Kinetic Couch Awakens
  • Micah on Core Plumbing is Done!

♣ Archives

  • January 2023
  • June 2020
  • April 2020
  • March 2019
  • May 2018
  • March 2018
  • May 2017
  • April 2017
  • February 2016
  • January 2016
  • October 2015
  • September 2015
  • June 2015
  • April 2015
  • March 2015
  • February 2015
  • January 2015
  • December 2014
  • November 2014
  • August 2014
  • July 2014
  • June 2014
  • May 2014
  • February 2014
  • January 2014
  • December 2013
  • November 2013
  • September 2013
  • August 2013
  • July 2013
  • June 2013
  • May 2013
  • April 2013
  • March 2013
  • February 2013
  • December 2012
  • November 2012
  • October 2012
  • September 2012
  • August 2012
  • July 2012

♣ Categories

  • Alcohol
  • Arduino
  • Art
  • Building
  • Cats
  • History
  • Holidays
  • Home Improvement
  • Sketchup 3D
  • Space

♣ Meta

  • Log in
  • Entries feed
  • Comments feed
  • WordPress.org

Proudly powered by WordPress Theme: Chateau by Ignacio Ricci.